Recurring billing
Charge customers automatically on a schedule with subscription plans.
Use recurring billing when you charge the same customer on a regular schedule — for example, a monthly lawn care contract or a quarterly HVAC service agreement.
A plan is a saved billing template tied to one customer. You set how often to bill (weekly, monthly, etc.), what to charge for, and optionally a card to charge. Zoop then creates and sends each invoice on schedule — and if auto-pay is set up, collects payment automatically too.
How plans work
When you create a plan, Zoop calculates the first invoice date from the billing frequency you choose. On each scheduled run, it creates a new invoice from your line items, sends it to the customer (the same way a manual invoice goes out), and — if auto-pay is on — charges the card on file automatically.
The plan keeps a full history of every invoice it has generated. You can see it on the plan detail page.
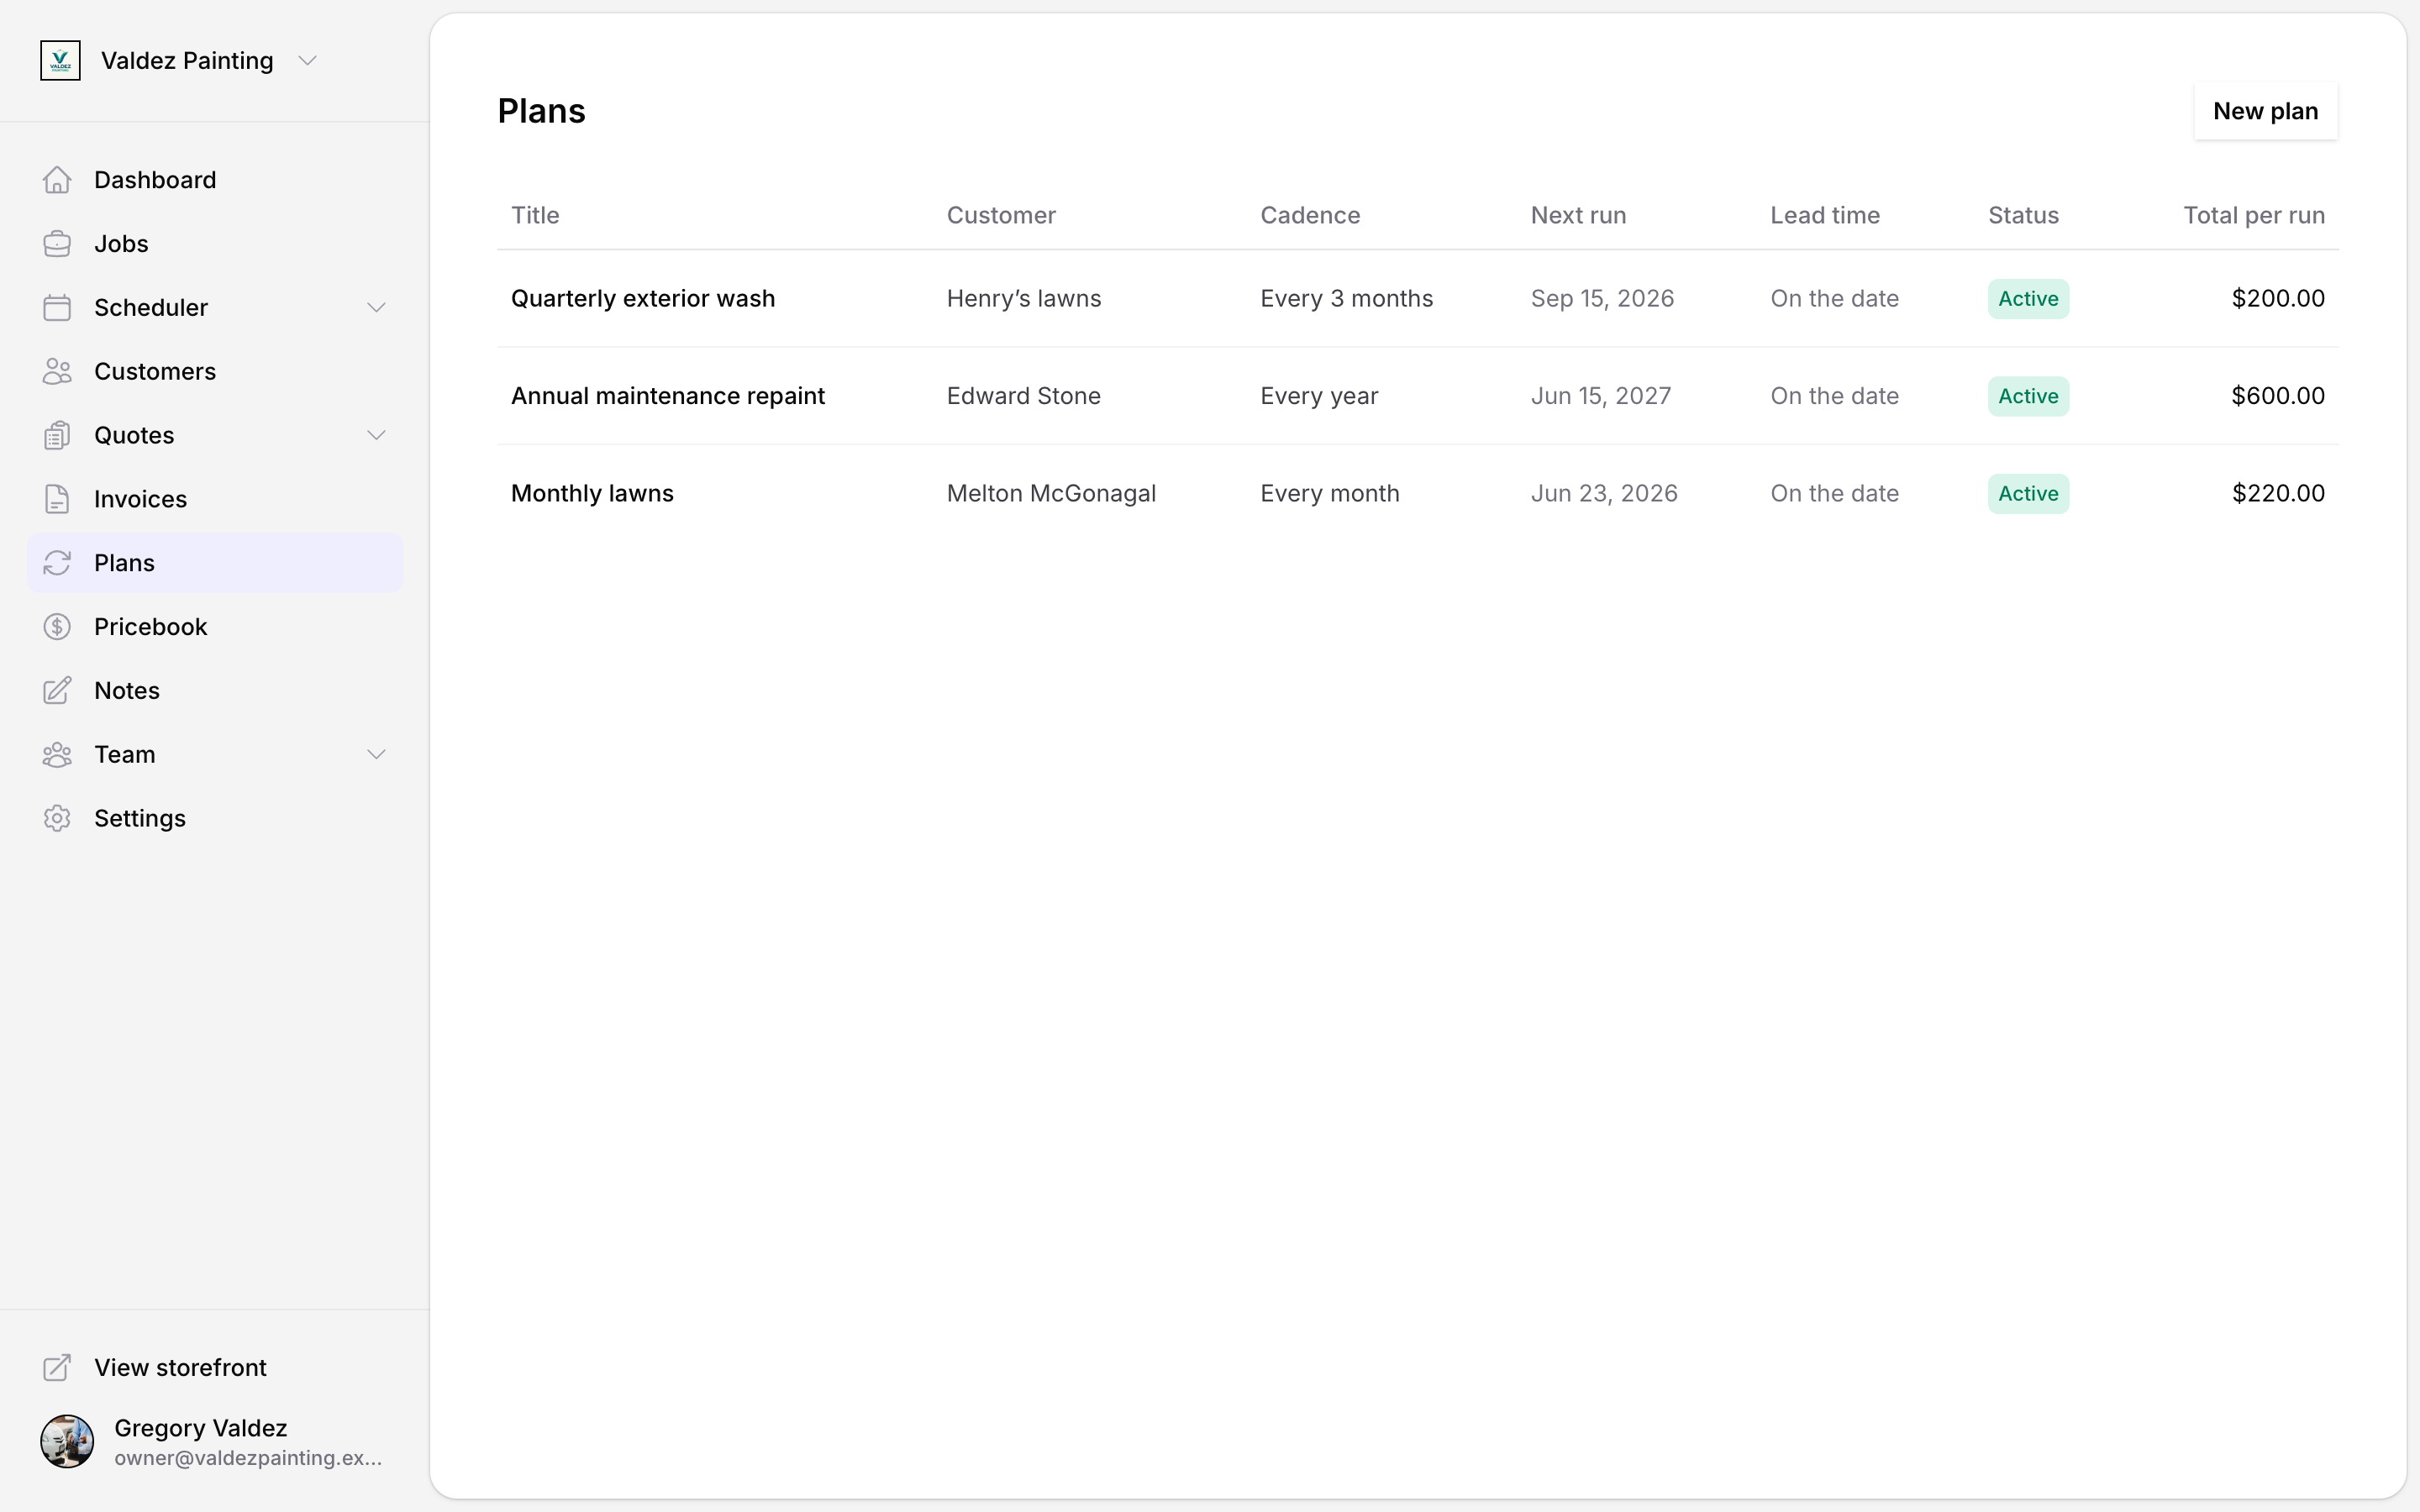
Create a plan
Open Plans
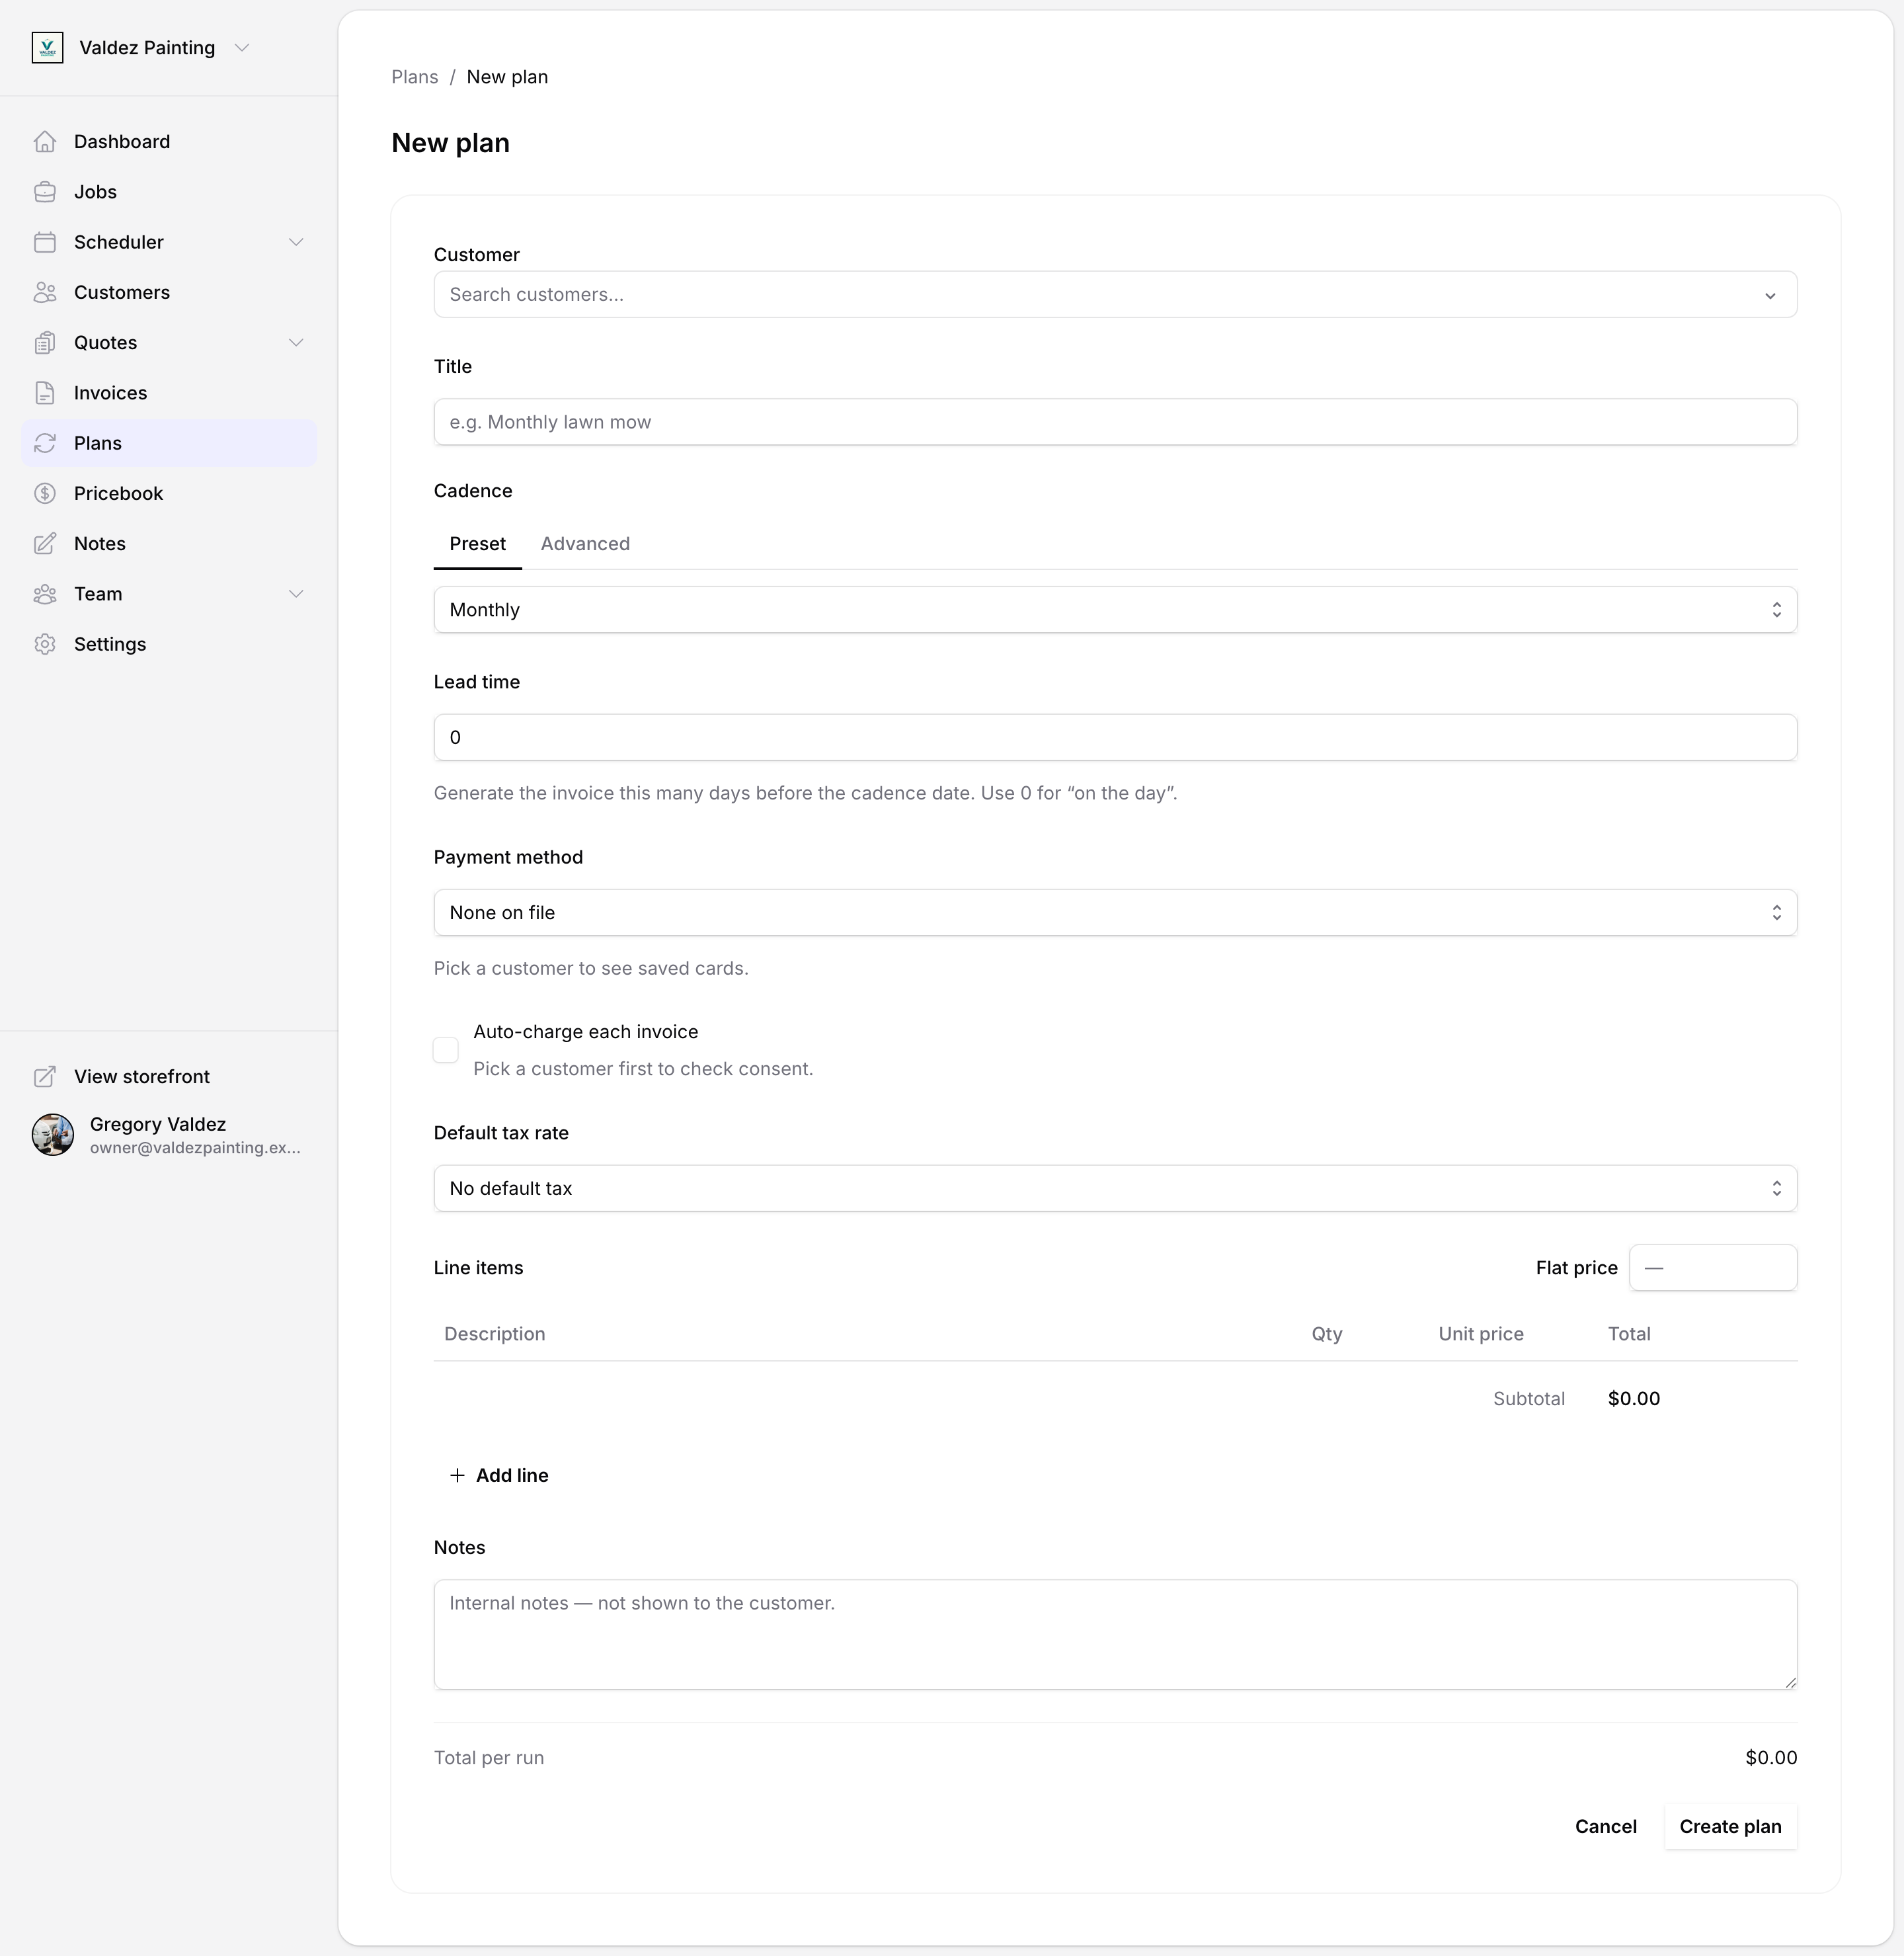
In the left nav, go to Plans, then select New plan.
Pick a customer
Search for the customer this plan belongs to. A plan's customer cannot be changed after it is saved.
Give it a title
Use something descriptive, like "Monthly lawn mow" or "Quarterly HVAC service". This appears on every invoice the plan generates.
Set the billing frequency
Choose how often Zoop should bill. The preset options are:
- Weekly
- Bi-weekly
- Monthly
- Quarterly
- Annually
If none of those fit, switch to Advanced and enter a custom schedule using an RRULE string (for example, FREQ=WEEKLY;BYDAY=MO,WE,FR bills every Monday, Wednesday, and Friday). Most plans don't need this.
Set a lead time (optional)
Lead time tells Zoop to create the invoice a number of days before the billing date. For example, a lead time of 7 means the invoice lands a week early — useful if you want to review it before it goes out. Leave it at 0 to create the invoice on the billing date itself.
Add line items
Add every service or product that should appear on each invoice. You can pull from your pricebook or enter items manually. The total per run shows at the bottom of the form.
Set a default tax rate (optional)
If you have tax rates configured in Zoop, pick the one that should apply to this plan's invoices by default. See Pricebook for how to set up tax rates.
Add notes (optional)
Notes are internal — they appear on the plan and are copied to each generated invoice, but are not shown to the customer.
Save
Select Create plan. Zoop sets the first invoice date and the plan is active immediately.
Set up auto-pay
Auto-pay lets Zoop charge the customer's saved card automatically each time an invoice is created — no manual collection needed. Before you can turn it on, two things must be in place:
- A card on file for the customer. You save a card on the customer's profile page. See Customers.
- The customer's consent to be charged automatically. Zoop walks you through a short confirmation step where you record that the customer agreed. This creates a billing authorization tied to the plan.
Auto-pay requires your business name to be set in Zoop settings. The mandate shown to the customer includes your business name; if it isn't set, the "Set up auto-pay" option is disabled. Add a business name in Settings first.
Capture consent and enable auto-pay
Open the plan
Go to Plans and open the plan you want to configure.
Set up auto-pay
In the Auto-pay section, select Set up auto-pay. Zoop shows a confirmation dialog with the terms the customer agreed to. Confirm on the customer's behalf. Once confirmed, auto-pay is active and Zoop will charge the card on file on each billing run.
You can also set up auto-pay from the plan editor: open Edit plan, pick a payment method under Payment method, then select Set up auto-pay next to the auto-charge checkbox and check Auto-charge each invoice before saving.
When auto-pay charges the card
Zoop charges the card automatically only when all of the following are true at the moment the invoice is created:
- Auto-charge is turned on for the plan.
- A payment method is selected on the plan.
- The customer's billing consent is active and has not been revoked.
- The saved card is valid and was authorized at the time consent was captured.
If any of those conditions aren't met, Zoop still creates and sends the invoice — the customer just pays manually via the invoice link.
Manage an active plan
Open a plan from the Plans list to see its summary, auto-pay status, and invoice history. The Actions menu gives you these options:
Charge now
Generates today's invoice immediately and, if auto-pay is on, charges the card on file. The customer gets the invoice email the same way as a scheduled run. Zoop asks you to confirm before charging.
This option is available only when the plan is active.
Skip next
Skips the upcoming billing period. Zoop won't create an invoice for that period, and the plan resumes its normal schedule after that. Zoop asks you to confirm — a skipped period can't be undone, but the plan itself keeps running.
This option is available only when the plan is active.
Pause a plan
Pausing stops Zoop from generating any more invoices until you resume. The plan stays in your list with a Paused status. Use this when work is temporarily on hold.
To resume, open the Actions menu and select Resume plan. Pausing and resuming are reversible.
Cancel a plan
Canceling is permanent. Zoop stops generating invoices and the plan moves to Canceled status. A canceled plan cannot be resumed. You can always create a new plan for the same customer.
Zoop asks you to confirm before canceling.
Invoice history
Every invoice generated by a plan appears in the History table on the plan detail page. Each row shows:
- The date the invoice was generated
- The invoice number (links to the invoice)
- Status (draft, sent, paid, overdue, void, uncollectible)
- Outcome — whether it was charged via auto-pay, is pending, or failed
- Amount
The history is paginated 20 invoices per page.
Plan statuses
| Status | What it means |
|---|---|
| Active | Plan is running. Invoices generate on schedule. |
| Paused | Invoice generation is paused. Resume to restart. |
| Canceled | Terminal. No further invoices will be generated. |