Customers
Add and organize customers with contacts, service locations, tags, and history.
Customers is your address book in Zoop. Every job, quote, and invoice ties back to a customer record. You can store individuals or companies, add multiple contacts and service addresses, and see the full communication history in one place.
The customers list
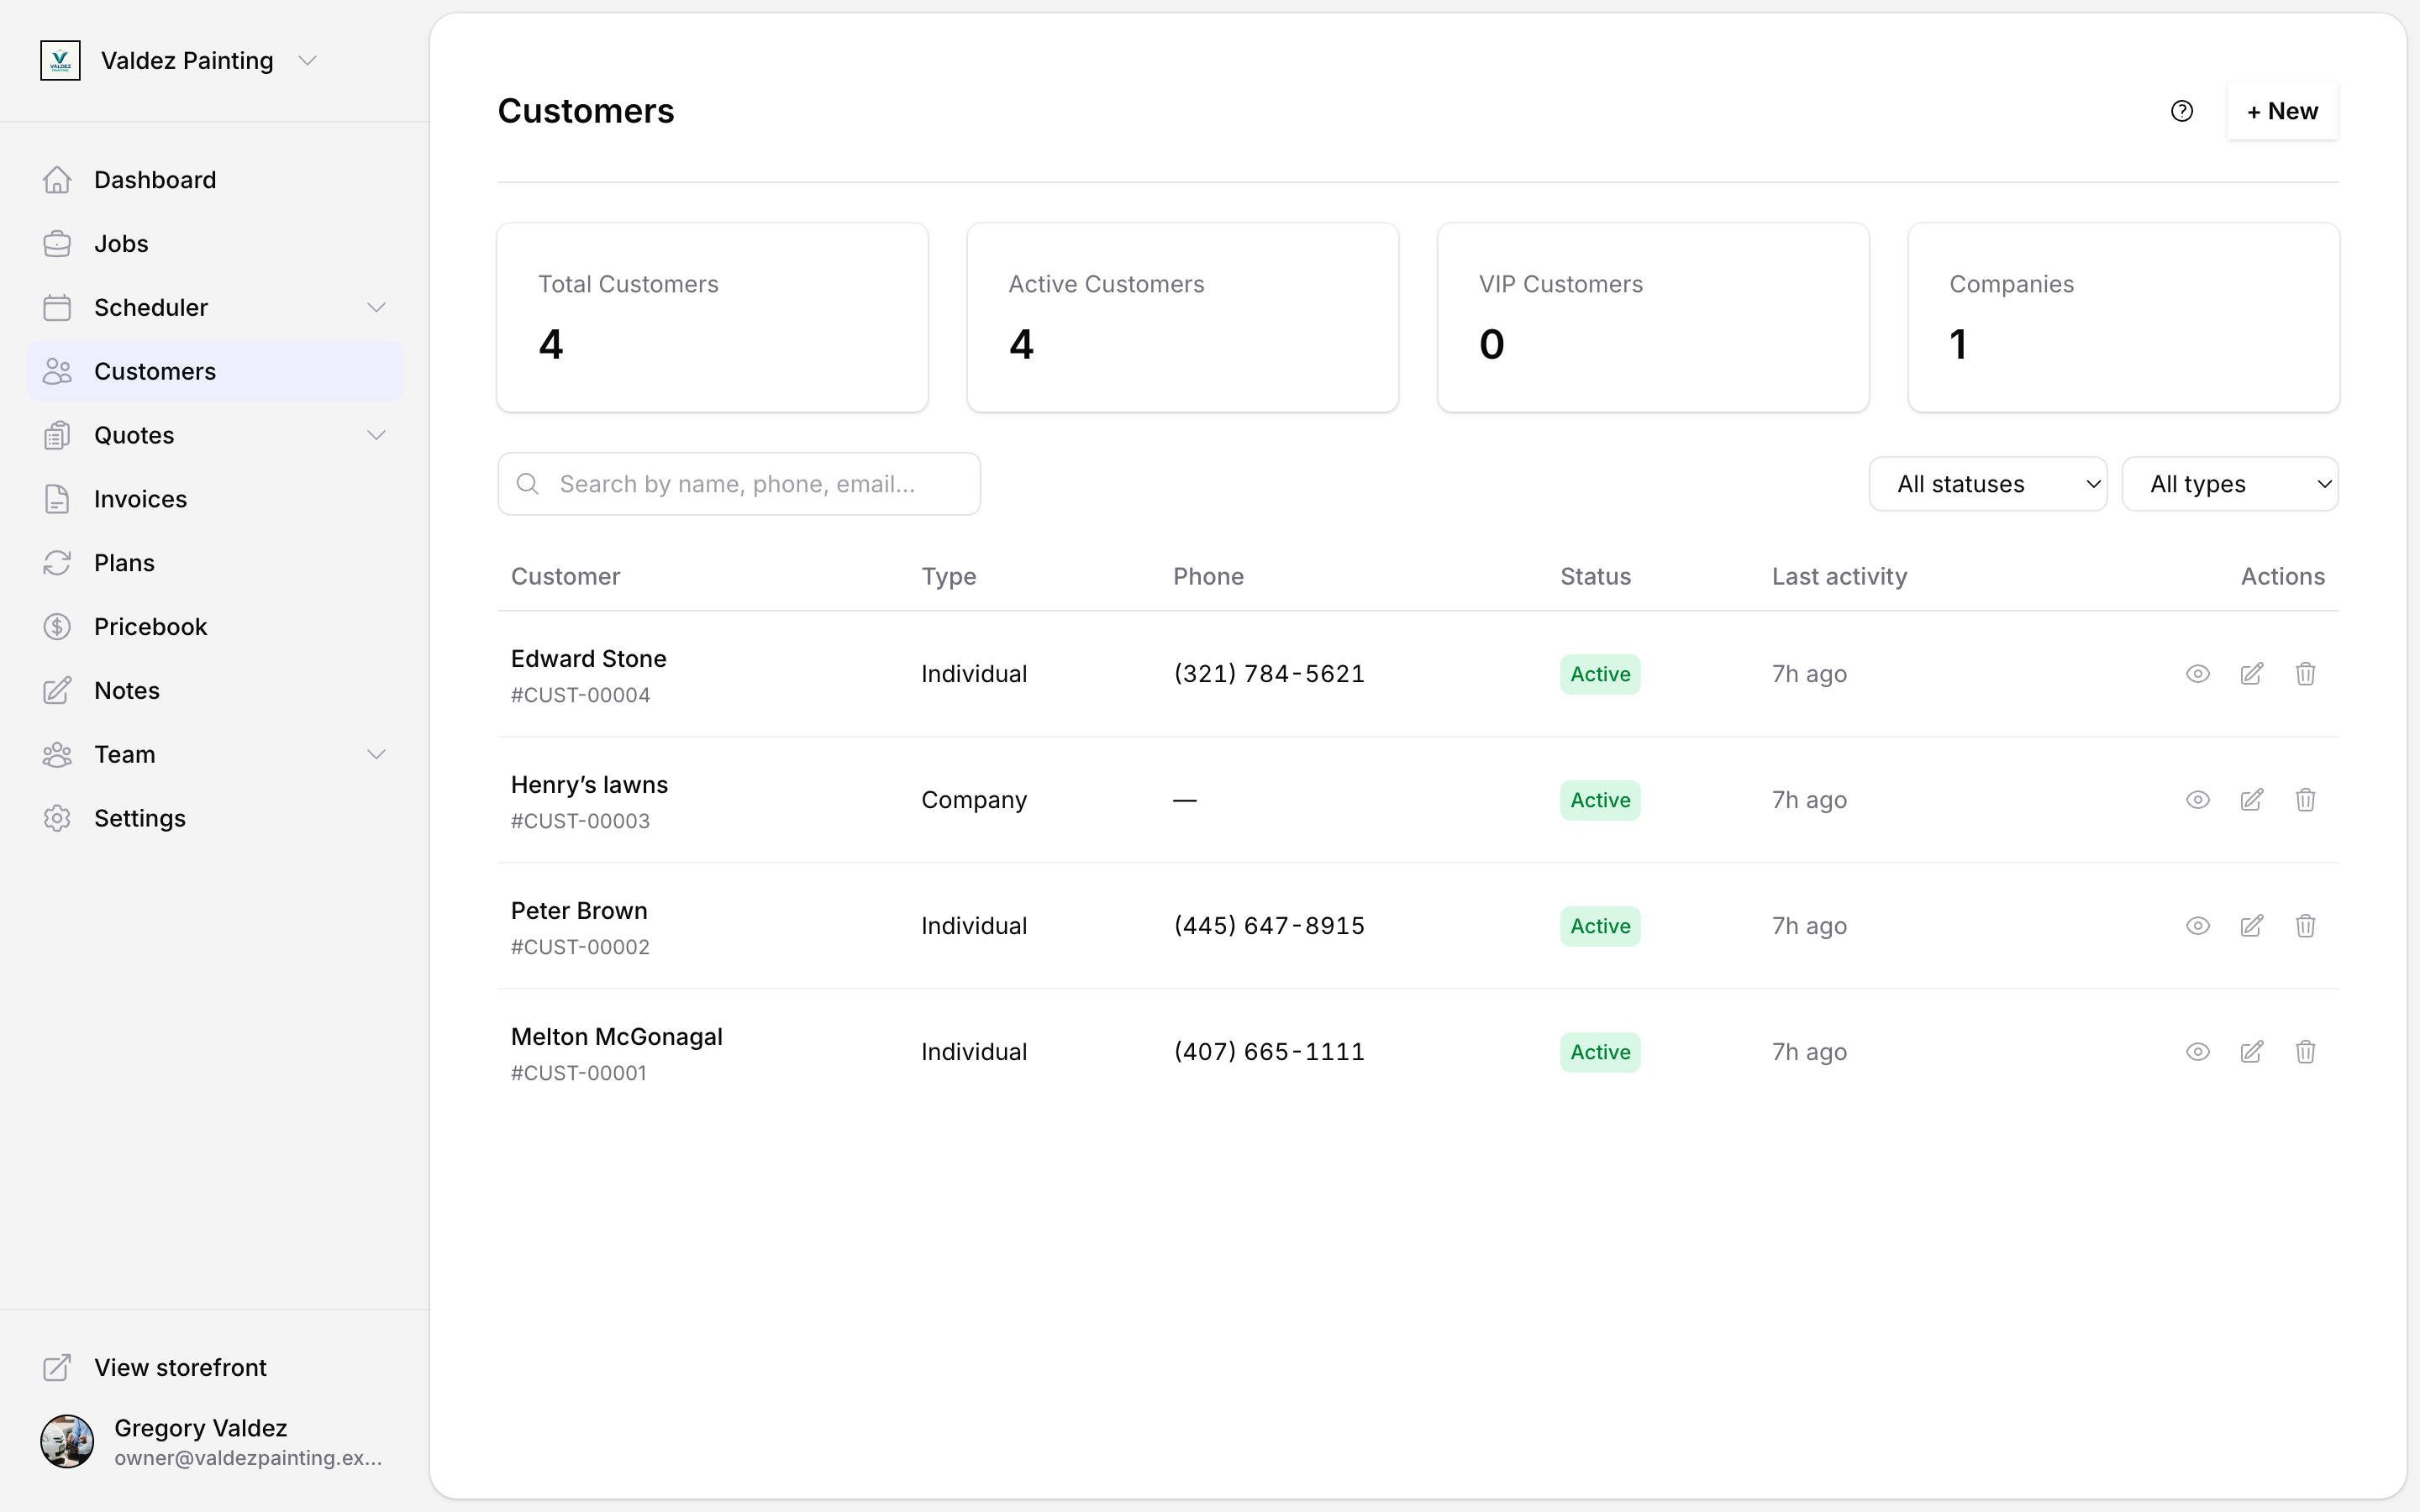
Select Customers in the left sidebar. You'll see four summary cards at the top — total customers, active, VIP, and companies — then a table of all your records below.
Each row shows the customer's name, type, phone number, status, and when you last had activity with them. A gold star means VIP; a ban icon means do-not-contact. Select any row to open that customer's detail page.
Search and filter customers
Type in the search bar to find customers by name, phone, or email. Use the dropdowns above the table to narrow by status (active, inactive, archived), type (individual or company), or tag.
Add a customer
Open the new customer form
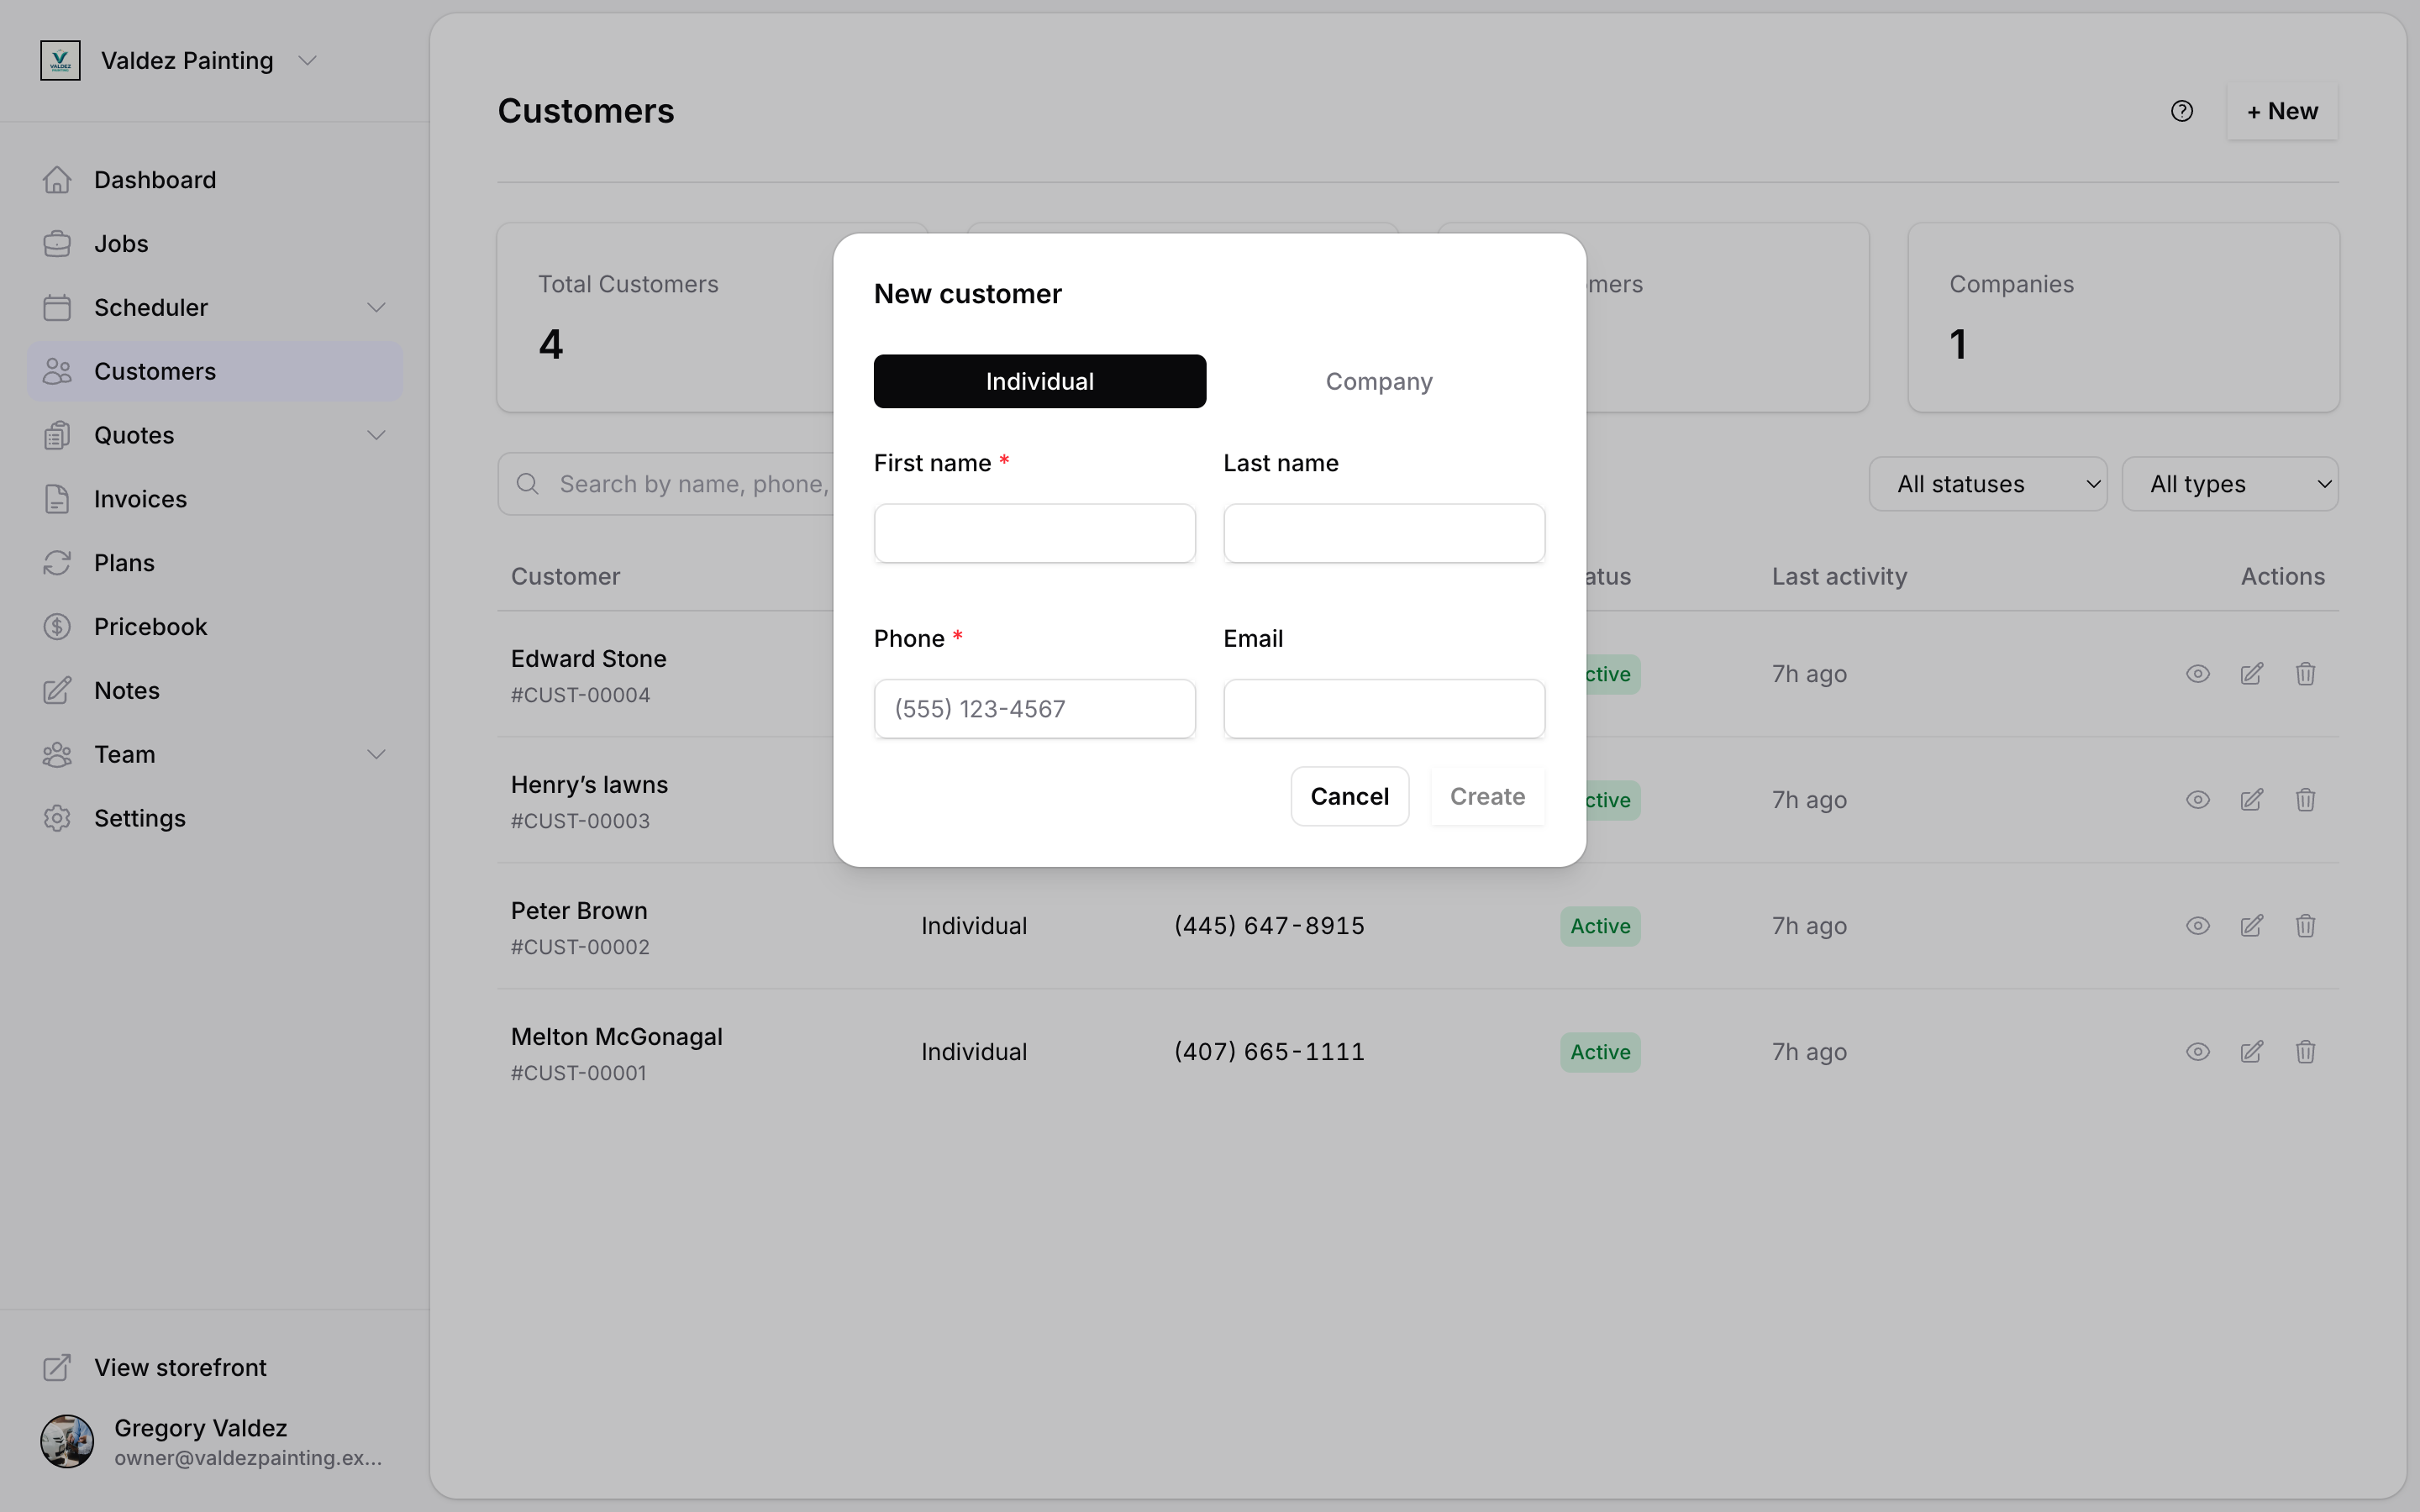
On the customers list, select + New in the top-right corner. A form appears asking you to choose Individual or Company — pick whichever fits.
Fill in the details
Individual: first name is required. Last name, phone (required), and email are next.
Company: company name is required, phone is required. You can optionally name a primary contact. Email is optional.
Phone must be a valid US number. Zoop formats it as you type, so just enter the digits.
Save the record
Select Create. If the phone number already matches an existing customer, Zoop opens that record instead of creating a duplicate — no harm done.
You land on the new customer's detail page.
The customer detail page
When you open a customer, you see their detail page. It has seven tabs across the top: Overview, Contacts, Locations, Timeline, Billing, Notes, and Files.
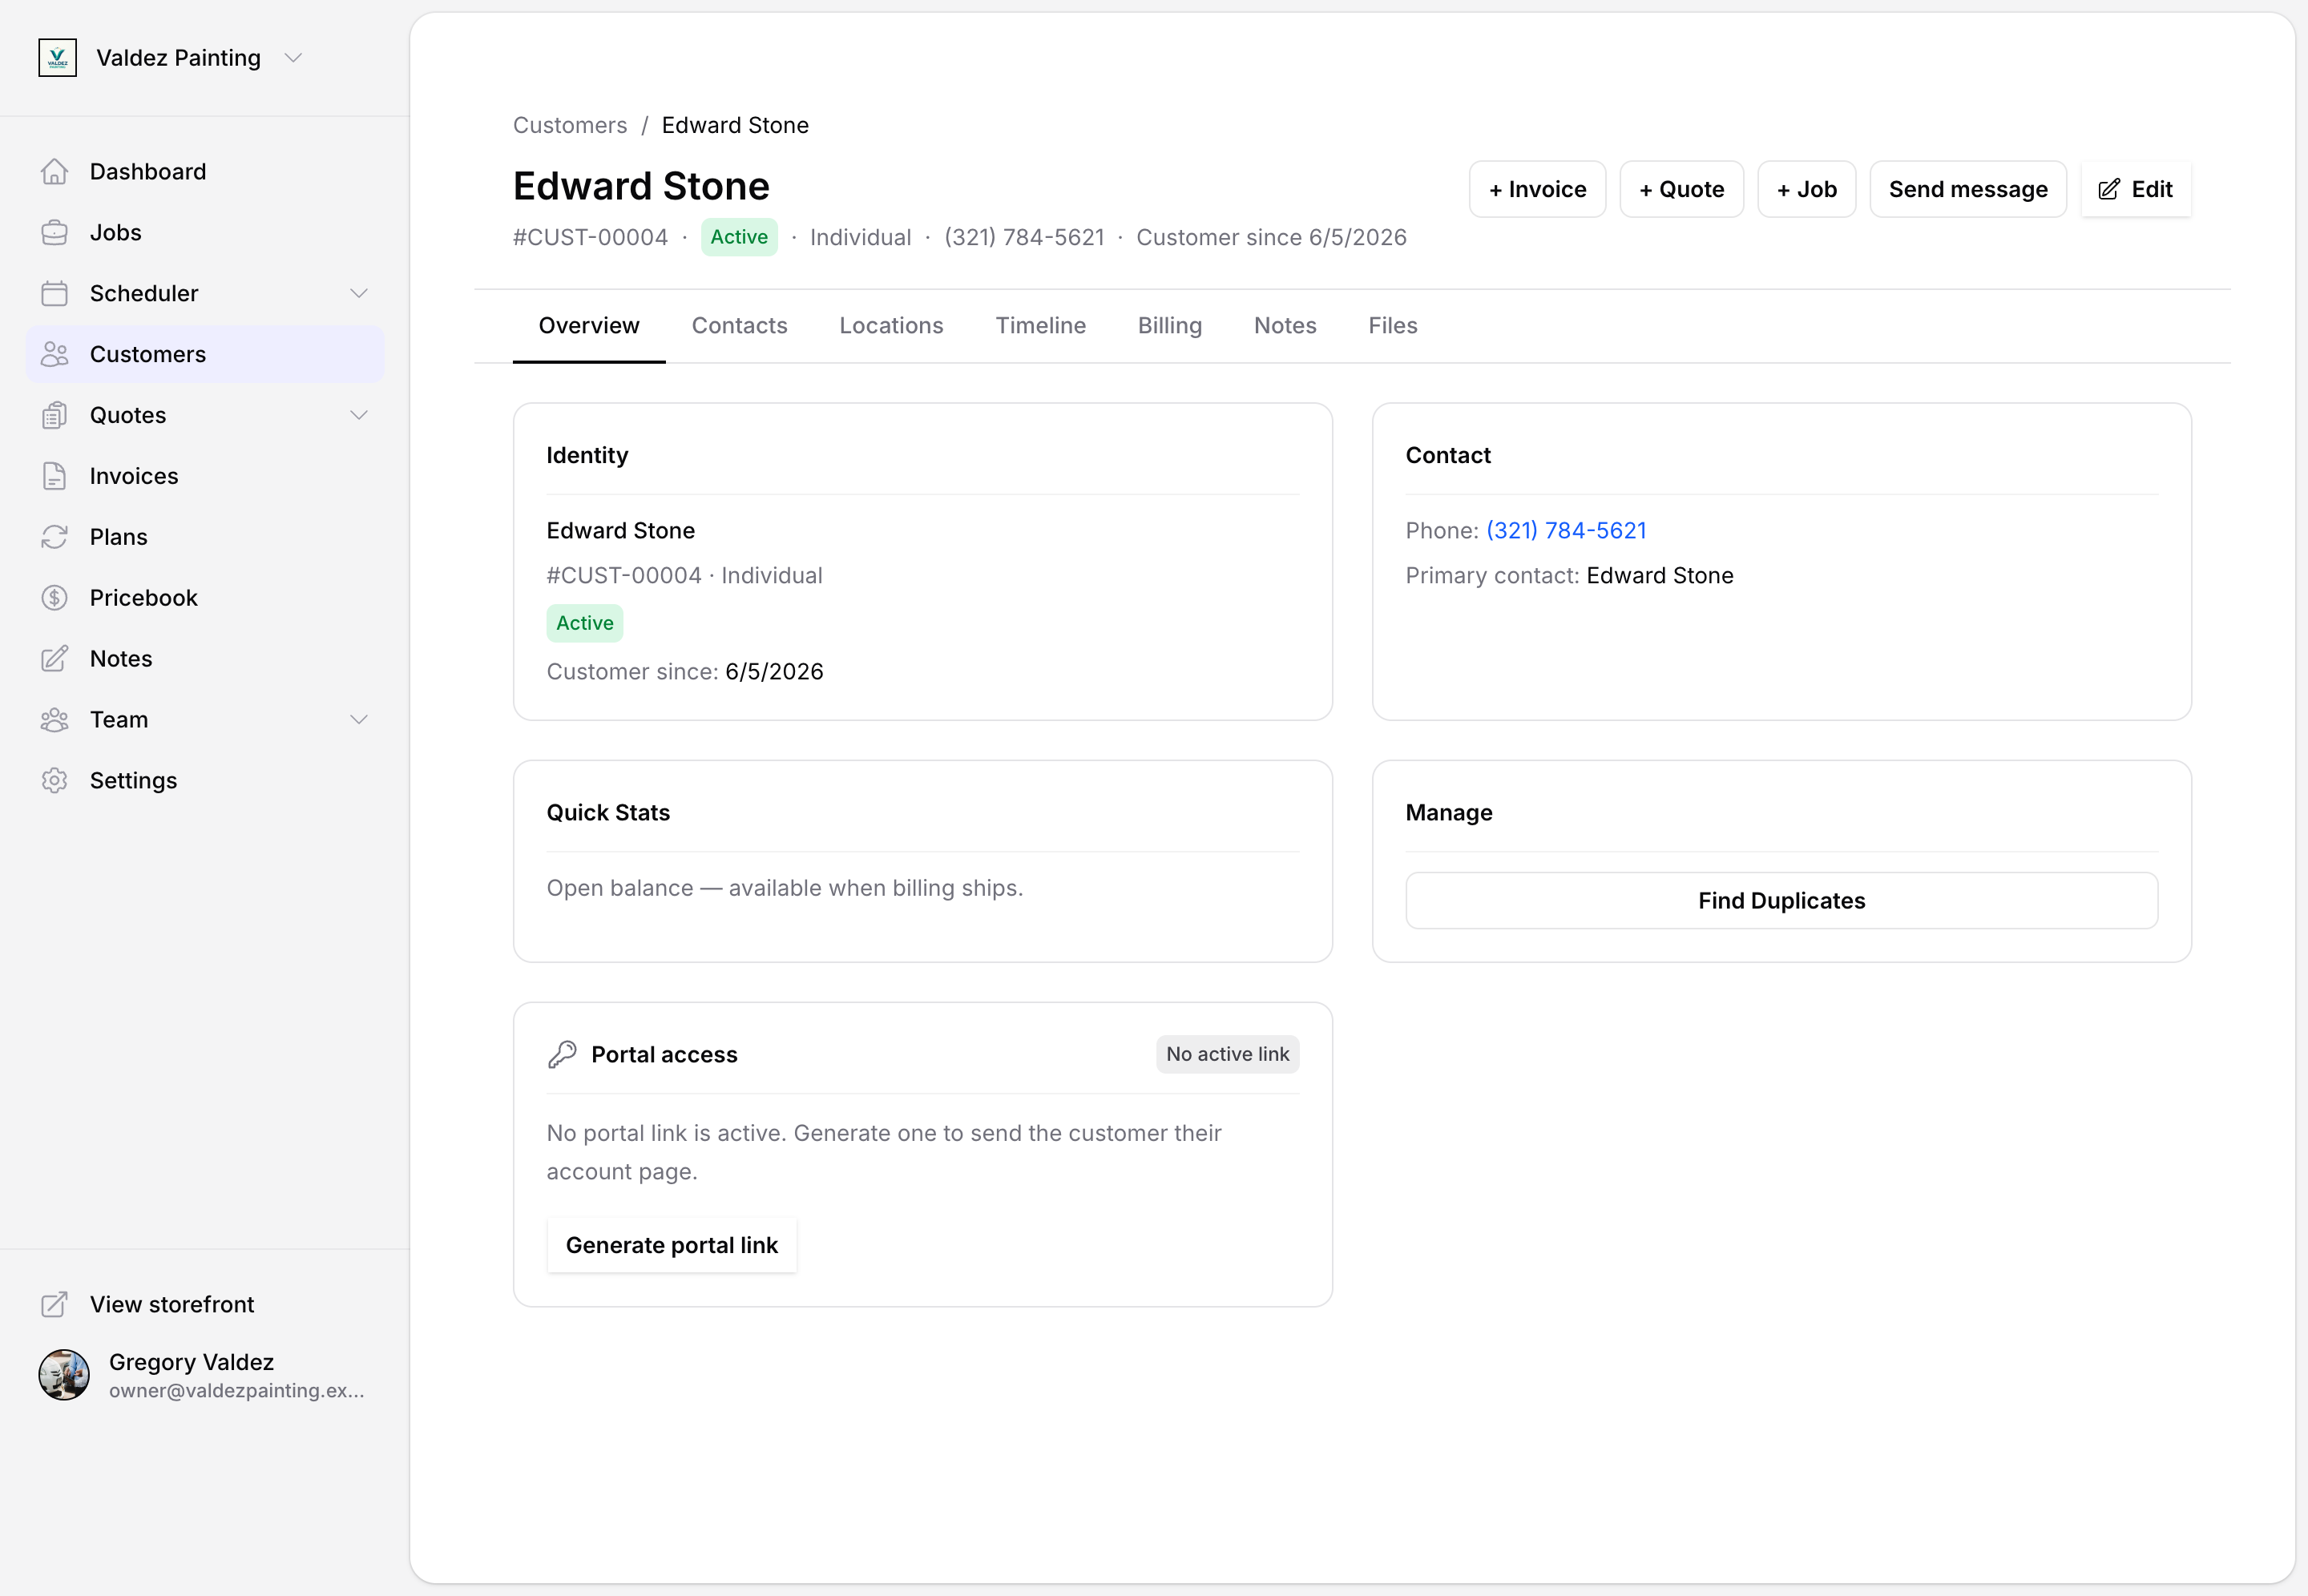
Overview tab
The overview shows four cards:
- Identity — name, customer number, type, status, VIP badge, do-not-contact badge, and source.
- Contact — primary phone, email, and primary contact name.
- Quick Stats — open balance (available when billing ships).
- Manage — where you find the duplicate-merge tool.
Edit a customer
To change a customer's name, status, VIP flag, do-not-contact flag, source, or internal notes, open the customer detail page and select the pencil icon in the header.
The edit form has these sections:
- Identity — first/last name for individuals, company name for companies. Note: customer type (individual vs. company) cannot be changed after creation.
- Source — how the customer came to you (manual, storefront, referral, import, and others).
- Behavior — two toggles:
- VIP customer — marks the customer with a star in the list and on their record.
- Do not contact — marks the customer with a ban icon. You must enter a reason when you turn this on.
- Status — active, inactive, or archived.
- Internal notes — private notes visible only to your team. Customers never see these.
Select Save when done.
Contacts
A customer can have more than one contact. For individuals, a primary contact is created automatically when you add them. For companies, you can add a primary contact when you create the record and add more people any time.
Go to the customer detail page and select the Contacts tab to manage contacts.
Add a contact
Select Add contact. Fill in first name, last name, phone, email, and preferred channel (SMS, email, or phone). Select Save.
Edit or delete a contact
Each contact card has an edit and a delete action. To make someone the primary contact, select the promote-to-primary action on their card.
Service locations
Locations are the addresses where you do the work — or where billing and mailing go. A customer can have multiple locations of different types: service, billing, mailing, or other.
Go to the customer detail page and select the Locations tab to manage locations.
Add a location
Select Add location, then:
- Choose the type (service, billing, mailing, or other).
- Optionally add a label such as "Main office" or "Warehouse" to make it easy to tell apart.
- Start typing in the address field — it autocompletes from Google Places. Or type the full address manually.
- Fill in address line 1, city, state, and ZIP (all required).
- Optionally add access notes, parking notes, and service notes — your techs see these when they open the job.
Select Save.
Communication timeline
The Timeline tab shows every SMS, email, call, and AI session Zoop has logged for this customer, newest first. Select a filter chip — All, SMS, Email, Calls, or AI sessions — to narrow the list to one channel. Select Load more to see older entries.
Notes
The Notes tab is a shared internal feed for your team. Notes are private — customers never see them. For more on how notes work across jobs and customers, see Notes.
Files
The Files tab is where you attach documents to a customer record — things like signed contracts or certificates of insurance. Supported categories are MSA, contract, COI, photo, and other. Filter by type using the chips at the top of the tab. Select the download icon to open a file, or select delete to remove it.
Tags
Tags let you group and filter customers — for example, "Residential" or "Priority". They're a shared label library for your whole account, not tied to a single customer. When tags exist in your account, a tag filter dropdown appears on the customers list so you can filter by any tag.
Mark a customer as VIP
Open the edit form (pencil icon in the header) and turn on the VIP customer toggle. The customer's name shows a gold star in the list and on their detail page. Turn the toggle off the same way to remove the VIP status.
Mark a customer as do not contact
Open the edit form and turn on the Do not contact toggle. Zoop asks you to enter a reason — this gets saved and shown on the customer's overview so your team knows why. A ban icon appears next to the customer's name in the list.
To clear it, open the edit form and turn the toggle off. The reason is removed automatically.
Merge duplicate customers
If the same person or company ended up with two records, you can merge them into one. All their jobs, invoices, contacts, and locations come with them.
Open the customer you want to keep
Go to the detail page of the record that should survive — the one whose name and history you want to keep.
Find duplicates
On the Overview tab, find the Manage card and select Find duplicates. Zoop searches for records that share a phone number, email, or similar name, and ranks each match by confidence (high, medium, or low).
Choose the duplicate
Select the candidate you want to fold into the surviving record.
Confirm the merge
A preview shows both records side by side. Choose which primary contact to keep — the surviving customer's or the merged one's — then confirm. The merged record's contacts, locations, jobs, and invoices move to the surviving record, and the duplicate is removed.
Archive a customer
Archiving hides a customer from the default list — it does not delete them or any of their history. You can still find them any time.
To archive from the list, select the trash icon on any row and confirm.
To archive from the detail page, open the edit form (pencil icon), scroll to the bottom, and select Archive customer.
To find archived customers, open the status filter on the customers list and choose Archived.
Customer portal
You can send a customer a private link to their own portal, where they can view invoices and manage their payment methods without calling you. See Customer portal for how to generate and share a link.
Related
- Jobs — create a job for a customer
- Quotes — send a quote before booking the job
- Invoices — invoice a customer after the work is done
- Notes — internal notes on customers and jobs
- Customer portal — give customers self-service access
- API reference — customers — manage customers programmatically